
Showing posts with label Einherjar tips. Show all posts
Toolkit for Einherjar Newcomers part 4
 |
| Einherjar warriors |
I will add some things.
Two kind of players:
-Slow Player. Level all his lowbies in base till lvl 30 and only get into expedition with 18 recommended battle times. He will mate his units very young and will get best babies.
-Grinder. Will battle a lot and thus his units will get old faster. He will get babies with lower th but the time the slow player can breed one generation, the grinder can breed two and this will compensate. He will get more items with sacrificing caus he will sacrfice twice more units and obsicouly way more drops from his fights. Also it seems that the latest the generation is, the easier it will be for the units to get stats every level.
About demi humans and mating:
Demi Human = pooka or empusa (or their advanced versions baphomet and succubus).
If you mate a demi human with a human, the baby will always get born with the job of the human. So if you want a demi human baby, you have no choice but to mate an empusa with a pooka.
Others
Upgrading items
Some items can only be created via the repair tab if you have a particular item in your inventory. Here is my list, if you know some others please let me know.
Heal Leaf -> Heal Potion
Heal Leaf -> Dispell Potion (useless atm)
Mana Robe -> Battle Garb
Arrow Ring -> Ranger Ring
Safeguard Ring -> Phalanx Ring
Desperado Ring -> Savage Ring
Diamond Ring -> Orichalcon ring
Some equips can also be upgraded with the same repair tab. It's the case for all the fake artifacts (usualy droped by bosses of the different maps). Each fake artifacts (R.xxxx) can be upgraded to normal version with 2 ori ores and to God version with a god ore. For example, the very commonly used accessory Liathfail:
R.Liathfail: Int+2, Tech+2, Agi+2, Luck+2, HP+5
Liathfail: Int+3, Tech+3, Agi+3, Luck+10, HP+5
God Liathfail: Int+4, Tech+5, Agi+5, Luck+10, HP+7
Some armors can be upgraded too with a certain limit (Cry Orchain, Cardinal Holy Shroud) or some weapons (labrys axe, failnaught, Joyeuse, Ice Falchion, Gaboi Spear, Zantetu Blade). They will get a +1 (or 2 or 3 etc... depending on the number of upgrades made) next to theri name.
Events
We have a great team of GM and new events are runned every weeks. Those events take place during each maintenance so be sure to check the latest main website news after each maintenance to not miss them. All events are really worth it.
Power
You can run very good without power. But don't hesitate to buy some to support this great game ^^
Power mostly help you achieve your goals faster. Power can be used to:
-Get additional lands for your base (600, 900 and 1200 power)
-Double xp for 3 days (300 pwr)
-Double drop for 3 days (300 pwr)
-Skip a year (30 pwr) but just ignore this, you can do this for free by moving a unit around the world)
-Change the name or the picture of a unit (30 pwr)
-Rejuvenation (300 pwr) can only be used on a hero. Makes the hero ten years younger.
-Reincarnation (250 pwr) can only be used on 0 year old lvl 1 units. Randomize the baby according to his parents status (sex, blood, and class can be changed). This can be useful if you mated two third class units with high th and you expect a third class baby (third class babies can have more max th at birth then class 1 & 2 babies). Or if you want to keep a god blood lineage (last baby of your unit with Odin blood, still no Odin baby and you'll loose the lineage, you can reincarnate till you get a baby with Odin blood). Or if you want your baby to inherit specific skills (example the father has Magic Break 3, which is a pain to get, and you really want to pass it to at least one of its kid)
-Raid protection (300 pwr). Will protect you from ennemy raids for 7 days. Will be canceled if you raid someone.
-Finishing a task (from 50 to 200 power). Instantly finish a task of one of your worker. Can be really helpful for example for last upgrade of a market which lasts 2 weeks!
-Refreshing summon list of the square (100 power). Or you can wait fro 00.00 server time for a free refresh. Really not worth it imo.
-Summon a brave (300 power). By using this feature you have a chance to see appearing a brave unit in your square (or a class 2 hero if you're lucky, or nothing if you're unlucky) ready to be summoned. A brave unit is a blooded unit with better stats then other units you can normaly find in square and with allready some good skills.
-Summon a Hero (600 power). Can get you any hero randomly, or a brave, or nothing. To know if a unit is a hero or not, it must appear in this page: http://www.ein-herjar.com/website/about/summon_hero.php
Note: heroes never lose LP no matter how or how many times they die in a fight. Heroes are good to get good children faster. In the long run, normal units will be way better then heroes. You'll get some free heroes with main quests (Bridget, Reis, Egil, Asteria and maybe Latona)
-Cold sleep (300 pwr per slot). It allows you to keep your units younger. Free come and go for 30 irl days then if a unit is in the cold sleep slot after the 30 days, it will remain frozen till you take it back. If you take the unit back after 30 days, the cold sleep slot will retrun to close state.
Free come and go for 30 irl days mean that you can get into expedition, fight as much as you want then return to your base before the end of the year. You put then each of the units you want to keep young in the cold sleep slots, pass the year by traveling to the closest destination then back to the base. Take back all the units in the cold sleep slots then repeat the process.
How to get free power?
-You'll get 2x300 with beginner quests
-You'll get 1 power every day you log in.
-Referal programs (click on the image on the top right corner of your screen)
-Events
Wikis
Finaly the best thing you might need, wikis with all infos about drops, quests, mobs locations (where can I find Ragnar?), items etc...
Wiki 1: http://tinyurl.com/bd85wq4
Wiki 2: http://tinyurl.com/8jls8ts
Wiki 1 is more accurate but wiki 2 has some things that wiki 1 hasn't, liek for example the position of units and ennemies at the beginning of the fight.
Note: those are translated versions of japanese wikis so names aren't always correctly translated but it's very easy to figure out.
If you have read it all, gratz you now know all you need to know. Now just roxx the place!
Thanks to Baenre Jarlaxle for rereading and for some suggestions that had to be added.


Toolkit for Einherjar Newcomers part 3
 |
| Einherjar home base |
You might have noticed or not but if you wanna be able to craft everything you'll need all shops (blacksmith, leather, cloth, magic and accessory) x2. Yes twice the hard work.
Blacksmith can let you produce swords, axes, spears, chains and plates.
Leather shop can let you produce leather armors, xxx leather (which are used for some crafts in other categories) and some accessories.
Magic shop can let you produce spells, accessories and some special items like runic proof or Elf Jadeite among others.
Accessory shop can let you produce shields, bucklers and bows.
Cloth shop can let you produce armors usualy used by mages or archers, garbs, surcoats (accessories with added hit and avoid) and cloth materials needed to craft things in other production tabs.
Max level or shops is 11.
Note: while all the weapons and accessories you can produce are tradables, only low level armors are. Weapons need a shop of its craft level to be repaired.
Special buildings:
Warrior house: allows you to mate units of opposite sex in order to get children. You can have a maximum of two warrior houses.
Square: for recruiting new units. Lvl 2 square can make lvl 10 units appearing, lvl 3 square (which is the maximum atm, 5 on the jp server) can make pooka and empusa units appearing in the square. You can have only one square maximum.
Monster Square: not implemented yet. Will allow us to recruit monster units (like ogres, fairies, skeletons etc...)
Lord House: determine the maximum number of each material you can stock. Level 1 allows 50 of each material and this number is doubled with each upgrade for a maximum of 3200 with level 7 (6400 with level 8 on jp server).
Fort: each fort can contain one unit that will defend you against ennemy raids. You can have up to three forts and their max level is 3. A fort increases the avoid rate of the unit in it.
Fort Level 1 - +5% avoid
Fort Level 2 - +15% avoid
Fort Level 3 - +25% avoid
If you have a guild, you'll get as many guild supports as you need to reach the number of 5 defenders (so 4 guild supports can help you if you have only one fort with a unit in it or 2 guild support units will join you if you have three forts with a unit in it). But beware, you can only have supports within a 5 level range of your units. So if your guild have lvl 50 supports avalaibles, you'll need to have at least one lvl 45 unit in a fort in order to get their help.
Same 5 levels range rule for raid attacks, you can use up to 3 units for a raid + one support from the guild for a total of 4 attackers.
Big Tree: gives a def/mdef bonus to your units in your fort(s). The bonus does not apply to support units.
Big Tree Level 1 - +3/+3 Defence/MDef
Big Tree Level 2 - +4/+4 Defence/MDef
Big Tree Level 3 - +5/+5 Defence/MDef
Big Tree Level 4 - +6/+6 Defence/Mdef
Big Tree Level 5 - +7/+7 Defence/Mdef
Alhing: 4 options avalaibles with this building.
-Delete Data: hope you'll never use this button and will keep playing.
-Ceremony: add a bonus to a unit equiped with a crystal (can be new skill, +1 of a particular stat or change of the unit's blood). Those crystals can be crafted with the combine tab of the production button.
-Sacrifice Soul: any lvl 45+ unit can be sacrified or heroes/braves at any time without any level limitation. Sacrificing a unit will give you a soul chalice by 100% chances. You can also get a blood of the unit's blood by chances. In the case of a hero you'll get a massive of its blood by 100% chance and a blood of its blood by 100% chances for a brave. You can also get by 100% chance a stat blood for each stat the unit will have maxed before getting sacrified. So if your unit has maxed for example str, int and tech, you'll get str blood, tech blood, int blood, soul chalice and maybe a blood of its blood. Max stats for each classes can be checked here: http://forum.ein-herjar.com/viewtopic.php?f=10&t=944. Thx Zsaber.
-Change Job: allows you to change job of a unit equiped with runic proof or valaha god proof. Runic proof are used to access 2nd class jobs and valaha god prooves to access 3rd class jobs.
Sword Fighter -> Sword guard or Sword Master -> Highlander
Axe Fighter -> Axe guard or Axe Master -> Berserker
Spear Fighter -> Spear guard or Spear Master -> Servant
Half Elf -> Elf Lord (less then 300 notoriety) or Dark Elf (more then 300 notoriety) -> High Elf
Sister -> Bishop -> Cardinal
Templar Knight -> Paladin
Archer -> Ranger -> Hawkeye
Empusa -> Succubus
Pooka -> Baphomet
How to get runic and valaha god prooves?
You need to craft proof of Sven Warrior + proof of Dane Warrior + proof of Norse Warrior with catalyst tab to get one runic proof. Freya Emblem + Thor Emblem + Odin Emblem will make a Valaha God proof.
Every Monday at 16.00, you'll get one random warrior proof if you have at least one unit lvl 20+ and one random emblem if you have at least one unit lvl 40+.
Other ways to get warrior prooves and emblems:
-Raid other players, every warrior prooves and emblems have one rarity.
-You can drop warrior prooves on certain spots of some maps.
-You can buy warrior prooves 80k each in Edinburgh if it's on the sale list of the day (but better buy allready made runic prooves in the market fot 100-150k)
-Some colonies have warrior prooves in their spoil list to be distributed.
-If you are the MVP of a colony (means your guild has taken the colony and you're the one of your guild who scored the most points there) you can get a runic proof, an emblem or a valaha god proof depending on the colony.
-Events
So technically the best way to get valaha god prooves is to raid players with lvl 40+ units.
Best moment to use a runic or Valaha god proof?
As 2nd classes get more stats per level then class 1 units and class 3 even more, best time to use those is at lvl 1.
There can be an exception about skills. For example only masters can learn the skill Double attack 4. So if for example you have an axe fighter who got born with DA 1 and you want a berserker with DA 4, you'll need to use a runic proof on lvl 1 to turn the axe fighter into axe master. Then level the axe master to lvl 24 in order to have DA 4 and finally use valaha god proof in order to have a berserker with double attack 4. (note: if your unit got born as a berserker the only way to get DA 4 would be to use a double attack crystal once your unit has DA 3)
Another example would be leveling half elf to lvl 10 in order to have bow avoid skill, then turn him into dark elf or high elf for Double Magic 4. Or get critical 4 as ranger then turn him into a hawkeye caus hawks can't learn critical 4 while rangers can.
Note: units get an additional skill at lvl 10, 17, 24, 31, 38 and 45.
You can check all skills and there effects here: http://forum.ein-herjar.com/viewtopic.php?f=10&t=733 (thx again Zsaber)
Skills that each different classes can naturally learn: http://forum.ein-herjar.com/viewtopic.php?f=10&t=758 (thx to nerovesper)
Additional lands:
You can get up to 4 additional spots to build new buildings. 3 can be bought with power (600, 900 and 1200 power) and 4th can be goten with destiny quest. I suggest that you spend the power you'll get with beginner quest (2x300 power) for the first new land.
What bases of the top players look like
All shops x2
3 forts
1 big tree
1 square
1 warrior house
Lord House
Althing
Remaining slots if there are any will be filed with markets usualy (the easy free cash it provides allow to buy whatever is needed)
Autoproducing facilities are good for those who play time to time five minutes a day. If you're an active player you'll slowly destroy them one by one to replace them with more useful buildings.
Toolkit for Einherjar Newcomers part 2

You can get in expedition as soon as you start the game if you know what you are doing but I suggest you to wait till you have 8 units. How to get this number? Follow the beginner quests. At some point an elf (mage) and a sister (healer) will be added to you initial crew bringing the total to 5. Then later you'll be asked to build a square. Square allows you to recruit more units, up to three random ones every day. The recruit list changes everyday at 00.00 and it is highly suggested to check it every day and to recruit all blooded units (http://www.ein-herjar.com/website/guide ... lationship) that you can find there. Blooded units has better chances to get stats at every level up. Your lord start with the Brunhilde blood which help to increase str, def and hp.
So once the square in built you can recruit 3 more units bringing the total to 8.
Why 8 units? Up to 3 units can be working at the same time (harvesting, building or upgrading). It is highly suggested to have 3 constantly working.
About harvesting:
Mining brings you silver ore, tin ore, copper ore, lime, iron ore and corundum.
Loging brings you log, ash wood, oak wood, abies wood and line.
Quarrying brings you plant ash, obsidian, alunite, stone ore, quartz and beryl.
Hunting brings you bear, wolf, rabbit and food.
You can get your units up to level 30 in base with harvesting, building or upgrading. Once a unit hit the level 30 it won't get any xp from those with the exception of training.
Training is usable only by units lvl 20+. It lasts 8 hours and rewards the unit with around 300xp. You also have a chance to get an item by training (among ygg leaf, silk cloth, ogre skin, juton skin, imp skin, muspel stone, dwarf coin, blue diamond, secret of cyclops rock, ancient trees yutoun). Units are trainable till the max level aka lvl 50.
Lvl 1-10 units can harvest up to 60 minutes.
Lvl 11-20 units can harvest up to 120 minutes.
Lvl 21+ units can harvest up to 180 minutes.
So was saying before I interrupt myself that you can have up to 3 units working and a maximum of 5 units can participate in a battle in expedition despite you can bring with you up to 10 units. So that makes a total of 8. Bringing more then 5 units in expedition can have an advantage, you can have 5 "slaves" carrying brand new weapons for your main team so that they can change their equipment once the ones originaly carried run out of durability. Note: if a weapon reaches 0 durability it will be gone forever so better unequip it once it reaches low durability in order to repair it once you'll be back in your base. But bringing many units in expedition has also a disavantage. Indeed, the more units you take with you, the more food you'll consume.
About food:
If you reaches 0 food while your in expedition, all your units will start the battle with 1HP. So pretty tense to win with that huge disadvantage.
You can get food with a field, a farm, buy them 30 gold each in the market or raid those as seen earlier.
Refresh the page (F5)
If during a battle one of your unit die or if you break a weapon and you really didn't want that to happen, you can refresh the page to start the battle over. You can refresh as many times as you need in expedition. Refreshes are limited to 2 during colony attacks and upsala fights. Refreshing in a raid = auto loose and all your units will loose a LP.
Bonuses during a fight
Those who played FFT will try side and back attacks. Side attack doesn't give any bonus but attacking an ennemy in the back will provide you a +15% hit rate.
Also if a sword type unit attack an axe type unit, it will get a +15% hit rate too. Same goes if an axe type unit attack a spear guy or if a spear guy attack a sword guy.
Attacking from behind with a spell will not provide any bonus.
About xp:
Only the unit who kill the mob will get the xp. That's why leveling a sister can be boring caus she's generaly healing instead of hiting. If one of your unit get some xp in a fight, all your units will get a +5xp bonus at the end of the fight. I say if one of your unit get some xp caus it's not automatic. Indeed, the more th (sum of all stats, can be seen in the unit button of your unit tab or by adding str + tech + agi + def + int + luck of a unit) your unit have compared to the th of the mobs, the less xp you'll get. This can be decreased till 0. So for better leveling, the higher the map the better it is. Plus mobs of different maps give more and more xp.
Xp bonuses:
-Recommended battle times. Symbolised by the axes on the top of your screen, you get 3 of those every 8 hours. As long as you have recommended battle times, your xp will be multiplied by 5. You can stock up to 18 recommended battle times.
-Elite skill:
elite I: +20%xp
elite II: +50%xp
elite III:+100%xp
elite IV: +150%xp
Note: healing an undead will not damages it but will actually heal it. Healing mobs can sometimes be useful if you want to kill a specific mob with a specific unit without it getting ksed by the counter attack of another of your units.
Finish Battle Button
Using this will end your current battle. Can save you time if you know that there are no way that you can win the actual fight. But be careful if you use it, all your unit will lose one LP (which they all would have do anyway if you are no match against the ennemies). Saves also durability with the time and it will not be counted in Times of loss of battle ranking.
About the team
3 melees, 1 mage, 1 healer can clear any map with proper level and equips. If you're having a hard time you can use a corner of the map with the 3 melees blocking the path to your magic classes and abuse the standy option with melees.
My favorite PvE team is 2 melees, 1 high elf (high elves can use holy rosario spell so can help the healer sometimes), 1 cardinal and one hawkeye.
Toolkit for Einherjar Newcomers part 1
 |
| Join Einherjar for more coins |
-Do quests. To take a quest you must click on expedition button then head to the spot under your base called Hedeby. Go to the bar and here are the quests. Those are divided into two tabs: main quests and sub-quests. Main quests allow you to unlock new maps, get very cool items or gold in the case of bring x equips. It is advised to start with the sub-quest kill archers x5. It is pretty easy and fastly done and rewards you with 3k gold. Suggested to farm the first two spots of the first map for those.
-Trade silvers for gold in the market of Hedeby. The price for those is changed everyday at 00.00 server time and can vary from 50 to 100 gold each. Silvers are autoproduced by the building Market, the higher the level of the market, the more silvers are produced. You can have up to three markets (same maximum for all auto-producing facilities) and auto-produced goods are acquired every 8 hours at 00.00, 08.00 and 16.00 server time. Silvers are also used to repair weapons via the repair tab in the production menu.
List of items produced by auto-produce facilities: http://img11.hostingpics.net/pics/306317autoproduce.jpg
-Sell stuff in the market. You can stall up to 7 different kinds of items at once. Everything is sellable with the correct price.
-Participate in the Colony War (cw) with a guild every week-end. Fort each colony taken (up to two per guild) a pool of money and items is randomly distributed among each guild members during each maintenance which occurs every Wednesday between 14.00 & 17.00 server time (usualy it ends up to one hour earlier caus the staff roxx and work fast). Best colony has a pool of 2M gold distributed equaly between all guild members.
-Get into the top 10 of the weekly ranking (ranking then battle tab). Each player in the top 10 of this ranking on sunday at 04.00 server time get 10k gold and a random cool item (different for every players in the top 10). Plus the first player of the ranking get an extra 100k gold. You also get 250 free silvers at this moment if you have a unit in the top 30 of the unit rankng, but you'll have a long way to achieve this goal.
-Raid other players. If you successfully raid another player, you'll get 10% of his gold, 10% of his food and a random item with rarity that he may own. If the target has a higher notoriety then you do, you'll get 20% of his gold, 20% of his food, 20% of his silvers and the item with rarity. Note: equiped items and items stalled in the market cannot be raided, this is the best way to protect your precious things. So if one day you successfuly raid someone who had 5 rarity for example and you get no item it means that he had an item with 5 rarity that was equiped (items sold in hedeby aren't counted in the rarity rate). You can see the rarity of your items in the item tab before the details of the item. Raiding can be a dangerous experience, indeed any unit that die in a raid attack lose one LP just like in expedition. Once a unit reaches 0LP it simply disapear. It is suggested for beginners to try to raid the player with the lowest civilisation and no guild in their target list. Usualy they have no defense at all and thus it's an instant win for you. Units in defense never lose LP or weapons durability.
-Battle in expedition. every time you clear a stage you'll get some gold and some drops by chance.
Higher level, higher stats for Einherjar warriors
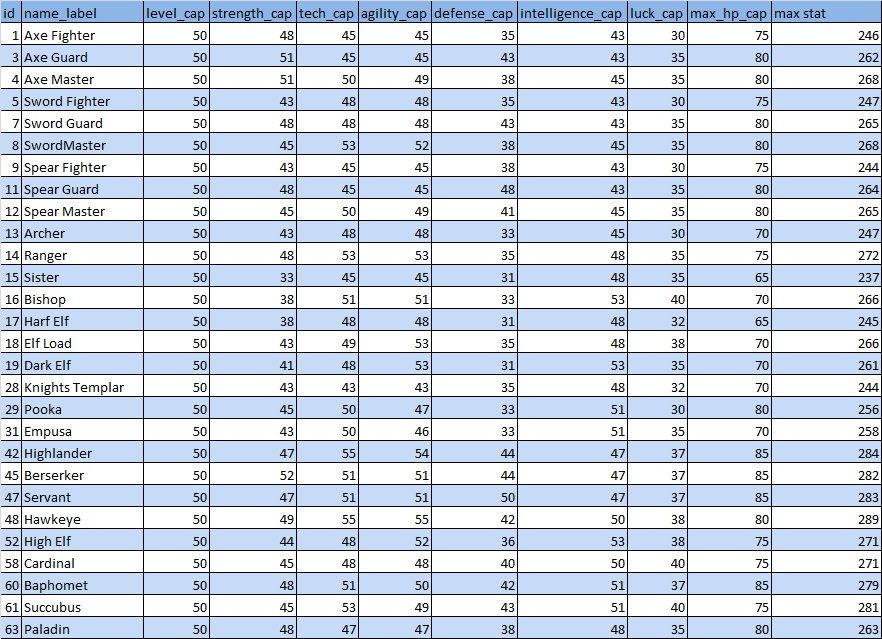
Max stats of new born babies will be half of their max stats.
Job class, learning and master skills
These are the list for job classes learning and master skills.
Basic Job - These are the first form of jobs.
Second Job - Requires Runic Proof on Basic Jobs.
Third Job - Requires Valhalla Proof on Second Jobs.
Learning Skills - The skill that job class learns by default.
Master Skills - The skill that the job can master.
Note: There are exception of skill that can be learned by all classes like Shield, Elite, and Bow Avoids.


- by nerovesper
Source: http://forum.ein-herjar.com/viewtopic.php?f=10&t=758
Generation of Strong Children
The main goal to have strong units is to have generations of children. To complete this you need to level your units to maximum level then those units will mate and have strong children. Then you level those children to maximum then mate them to have another breed of stronger children. That's the cycle of units. Also when units are maxed level, they can be sacrificed and turn to crystals that can be used to improve your units. Be aware that there are maximum status for units depending on their job classes. So there is a limit to this "strongness". Refer to this by zsaber -> Max stats of Jobs
Things you need to know about mating/birthing/breeding:
1.) When you place a couple in warrior house they will or will not show a heart symbol. The bigger the heart the higher the chance they will give birth. If there is no heart they will not give birth.
2.) Age of both couple must be 15 or above.
3.) Mating finishes every "day 1 month 1". So every new year in-game, that's the point a child is born but there are some instances of bad luck that they will not. Also technically speaking, a couple can give birth in 1 day if you placed them in warrior house at "day 31 month 12" and pass 1 day.
4.) Each unit can bear a maximum of 3 kids whether they mate with different partner or not. The chance they give birth are lessen every time they mate.
5.) Units from both either parents can't mate. So technically speaking, "brother and sister" or "step-brother and step-sister" cannot mate. Be reminded! Same gender can't bear kids!
6.) Child will inherit random amount of stats depending on the totals of each stats of both parents combined then divided randomly. The higher the stats of the parents, the higher the range of the random scaling of inheritance.
7.) Child will inherit 2 skills randomly from both parents.
8.) Child has a chance to inherit the blood of one of the parents.
9.) Child will be born as a random class from one of the parent's job class. Example: Dad is a Highlander and Mom is a Spear Master then their child can be born randomly as a Sword Fighter, Spear Fighter, Spear Master, or a Highlander. But the higher the job class the less chance he will become one but still possible.
You will need luck and some other info to bear strong children.
These are:
1.) Bloods are a good way of increasing the stats of units. Each Blood has a unique ability to increase certain stats. Sometimes units with blood appear in square by chance. You can also sacrifice your blooded units and have a chance to create a crytal that can give blood to a unit through that process.
2.) Another form of stat boost is upgrading your unit's job class, since higher jobs gain more stats. It is best to upgrade your unit's job at minimum levels preferably level 1, so that they can take the full benefits of the upgraded job. But there are some instances that you should not upgrade them early. Most reason for this would be trying to gain a maximum skill level. Every job class can't level all skill types to maximum but each job have their own ability they can level to max. Refer to this -> Job Learning and Master skills
3.) Parents' upgraded job class also plays a role in bearing a high-stat child. Every job class has its maximum stats at birth so higher job classes have higher max stat for a child to store. Refer to this by zsaber -> Max stat of new born baby
4.) When you look at the guild window, there's a line of numbers called Tribute Points. The higher the tribute points the better chance of: the child gaining more stats from parents, inheriting a parent's blood, and being born as a higher job class. Tribute Points is the total effort of the guild. It is increased whenever any members of the guild do the following:
*raid other players successfully
*one of their units die or sacrificed
*they use holy devotional stones
The fastest way for a guild to gain tribute points is to capture a fort(not referring to forts in base but the castle-like forts in colonial war). The guild gains 200 points for each fort and they can capture a maximum of 2 forts.
There are things I might have missed though. Anyway tribute points is really helpful in mating. Everyone in the guild will benefit from this points. Tribute points are reset to 0 every maintenance. Also it is after maintenance that guilds gain tribute points from captured forts.
Also you might want to check out some guides and tables here on how Einherjar works.
For example, stats in einherjar are gained by chance through percentage.
Here is a link for this info by zsaber.
Job, Blood Increase Rate
This is a very helpful table.
If there is something that I missed please tell me.
This is for a sole intention of giving our new players the knowledge for them to know about the game, give them interest, and expand our community. I hope this helps.
by nerovesper
Source: http://gameeinherjar.wordpress.com/2012/08/22/generation-of-strong-children/
How to get a strong baby, your future warrior
I – Tribute Point:The higher the point, you will have higher chance to have high class baby, that means the best time to bear is before 15h on Thursday, before the Tribute Point is reset, at that time the Point should be highest.
II – Max stats of new born baby:

III – How to calculate stats of the baby:Add points of the parents together and divide them by 3.5, you’ll get the stats of the baby. For example: I got Britania with Str 43, and Volsung with Str 34.
So 43 + 34 = 77, 77 / 3.5 = 22, but because their child is Spear Fighter, he only has 20 Str.
Same way to calculate with other status.
IV – Special birth:We mate a 45-lv unit with a 1-lv unit, the stats of the child will be divide by 2.7. Actually I never try it.
V – Note:1 – The best age for giving birth is 14-20, if your units are 2x or 3x years old, the stats won’t be divided by 3.5 but 4 or 4.5,… Besides, LP and age may affect to birth time, I mate a couple at 2x years old and it took 2 years to give birth.
2 – If the couple is not blood-related, you can put them in the Warrior House and go pass year, they will give birth at 15 years old, the child will get very good stats.
Hope this will help you train your babies
 .
.Source: http://forum.ein-herjar.com/viewtopic.php?f=10&t=735
Raising rate of jobs and bloodlines
Unit of measurements: %

Blood:


Hope this will help you choose your blood more suitable
 .
. By by zsaber
Source: http://forum.ein-herjar.com/viewtopic.php?f=10&t=743
The Art of (Fort) Defence part 2
The Pincer Formation takes the opposite viewpoint of the Turtle strategy. Instead of playing for time, its a much more aggressive strategy. Its designed to make your opponent pay for the raid attempt and to inflict a mild form of a psychological attack. Players who like to raid and craft characters based around forts and raiding will find this strategy very appealing and easy to implement.
The primary benefit of this strategy is that your opponent will lose units. For those who don't know, if a unit dies while raiding another player, they will randomly lose between 1-3 LP. This can be a hefty cost, and can put a dent into a person's raiding timetable. This is especially true for less 'dedicated' players where normal units may form a large, or all of their army. As characters not from the square can have LP ranging from 5-20, it means that realistically, the player can only use their characters a specific amount of times before it becomes too dangerous. While the Turtle formation may deal losses, it is only incidental to the overall goal. Here, it is very different. The defending player is purposefully choosing unit types and gear to maximise kill rating. It has a lower overall defence success rate, but it has the advantage of potentially sabotaging your opponent and giving him a really bad day.
Unit Type 1 - Hawkeye
Weapon - Shigeto Bow/Amenowakahiko
Armour - Leather Jerkin
Accessory - Ranger Ring/Orichal Ring
Skills - Critical + Double Attack/Resist
Reasoning - The Ranger is King of Defence. There is no question that any player will find these stalwart units to be the supreme unit for considering in a fort. The answer to that is simple. Unlimited Range. Rangers have the bonus that when they are on defence, they are able to hit any part of the map from their starting position. So right from Turn 1, where both sides usually have to spend just getting into contact, the Ranger is already eliminating key targets. And this is where the Rangers 2nd advantage lies. Their target priority. The main offensive force of most raiders is magic. As many characters have high natural physical defence, relying only on melee to win raids is one that won't work for very long. Given how hard it is to defend against magic, a good mage can significantly make raids easier to handle. That being the case, if you are able to take out your opponents mage it drastically reduces his chance of winning. As the game tends to class Sisters and Mages as higher priority than melee, this means that the AI controlling the Ranger will usually target softer targets first.
Ranger weapons don't tend to be that good, until you are able to get the Hama bow. These bows are far and away much better than your standard bows as they not only have high attack, but they also grant a sizable amount of Luck. This makes them the perfect weapon for Rangers. For armour, I chose the Jerkin because of 2 main features. The first is that it gives a decent amount of Luck, and the second is that while its defence is not as high as the other classes it gives a good amount of buffer hp. Since your Ranger would presumably not even be within range of enemy characters until around turn 3 (or later), that extra 15hp or so can provide more short term survivability than adding a few points of defence. Plus, it gives Luck. Choosing between the Ranger Ring and the Orichal Ring is more dependent on the stats of the ranger and your playstyle. The Ranger ring gives him some strength, and the all-important Hit so that he doesn't miss. The Orichal ring gives both strength and Luck, the 2 most important stats for any offensive unit. Both are good choices, so if you feel like your ranger has very high Tech and he is unlikely to miss, go for the Orichal ring. If you want to be absolutely sure none of his shots are wasted, equip the ranger ring. I should also note, that while the ranger skill is Crit, the Hawkeye skill is Resist. So if you want to reach Crit IV, it is advisable to not change his class until after he maxes Crit. Otherwise you'll end up with a Crit III Hawkeye, which isn't really that good.
With Unlimited range, a habit of killing mages, and very high damage output this unit is a must-have for any offensive fort defence. With high Agi and high tech, it will also make your ranger attack first, attack accurately, and get those powerful Crit and skill activations. Oh, and he can also be pretty good at dodging as well.
Unit Type 2 - Berserker
Weapon - Tabar
Armour - Leather Jerkin
Accessory - Ring of Destruction/Surcoat
Skills - Double Attack + Critical
Reasoning - The Berserker stands tall over other melee classes because of 1 aspect. Its strength. Not only does the Berserker tend to gain strength more easily than the other classes, but it has a higher maximum cap. While 5 strength might not seem like much, given the right kind of equipment that can translate to an extra 3 points of normal attack damage. When including the effects of Double-Attack and Critical, it becomes even more significant. The Tabar as the weapon of choice is simple, it is the most destructive weapon out of the axes available. Combining high base attack, reasonable hit, and good stat-ups makes it the weapon of choice for offensively minded players. As with the ranger, I chose the Jerkin for the berserker. While providing much less survivability than other potential armour pieces, its Luck and HP are unparalled provide the most offensively orientated stats among the armour types. As for accessory, people may wonder at why I include the Surcoat. An item which for the most part looks defensive or utility in nature. And its because the axe really has quite a low accuracy rating. It is pointless to have massive attack if you miss half the time, or even 1/4 of the time. So I include the Surcoat there for those players who want a little insurance that their axe will do the job. The Ring of destruction as the premier offensive accessory should be self-explanatory. It is a quest item so should not be difficult to acquire.
My next post will talk a bit about how the general strategy of the Iron Wolves guild army, and how it facilitates the use of good fort defences.
by galen_swiftblade
Source: http://forum.ein-herjar.com/viewtopic.php?f=10&t=736
The Art of (Fort) Defence part 1
It is not just proofs which are in danger though, as any item with a 'rarity' amount can be stolen. Treasure Weapons, valuable materials, all of these are vulnerable to theft by grasping hands. So even if you personally are not that fond of attacking other people, you will nevertheless find yourself under attack. So being able to defend yourself appropriately is a key factor in progressing further into this game. While there are many ways to defend yourself, I will (for now maybe) outline 2 main strategies which people can use to effectively defend themselves from thieves.
The Guild Army
Before I go into these though, I should mention a very important issue. And that is the Guild Army. Depending on how many forts you have available, the guild army will range from being either a major part of your defence, to nearly your entire defence. For those who are unaware, when defending yourself from an attacker you are allowed up to a maximum of 5 units for your defence. If you have 3 forts, the guild army will supply 2 reinforcement units. If you have 1 fort, the guild army will supply 4 reinforcement units. If you have 0 forts, you auto-lose. So make sure you always have at least 1 fort up and staffed.
What the above means is when deciding what sort of units to put in your fort, the composition and strength of the guild army matters a great deal. In order to mount the strongest defence you are able to, you must attempt to align your fort units with what may potentially appear from the guild army.
Defence Buildings and their Stats
The information below was gathered from the Japanese wiki. Located at http://wikiwiki.jp/ein-herjar/
Fort Level 1 - +5% avoid
Fort Level 2 - +15% avoid
Fort Level 3 - +25% avoid
Big Tree Level 1 - +3/+3 Defence/Resist
Big Tree Level 2 - +4/+4 Defence/Resist
Big Tree Level 3 - +5/+5 Defence/Resist
Big Tree Level 4 - +6/+6 Defence/Resist
Big Tree Level 5 - +7/+7 Defence/Resist
Now, on to the 2 main strategies!
Turtle Formation
The aim of this strategy is very simple. Its based around the turn limit mechanic in forts, and is also one of the more commonly used strategies deployed by players (whether knowingly or unknowingly). The main goal of this strategy is simple: Play for time. The damage or power of your units here is not as important as their durability. Because this strategy is based around survivability, there are a few unit types you can use as your main defence. Below are a few examples of the units and specs you would want to use in this strategy:
Unit Type 1 - Servant
Weapon - Gaboi Spear
Armour - Plate Armour/Shield
Accessory - Cardinal Ring/SafeGuard Ring
Skills - Terror + Resist + Shield (If grabbing safeguard)
Reasoning - Why a Servant over any other melee class? The answer is simple - Gaboi Spear. There are basically 2 types of weapons available for Spear users, Long Spears and Javelins. Long Spears are just like any other weapon, but Javelins are different. Unlike the other melee weapons which only have 1 range, the Javelin is able to hit from 2 spaces away (similar to the dagger). Most of the time the Javelin is not a good weapon as it is significantly weaker than long spears so the range benefit isn't worth the tradeoff for damage. However the Gaboi spear is different in that it has a very respectable 17 attack. This ranged bonus means that a Servant is able to attack enemies without having to worry about any counters at all. The armour can either be plate armour for massive physical protection, or the shield for a balanced mix of both. If you choose the plate, this Servant will literally be unkillable by non-magic. Even if the enemy shows up with a 60 damage double/crit melee, your unit will be able to shrug off that damage with ease. If you choose the shield, he gains a nice amount of physical protection, but more importantly, gains high avoid and good magic resistance. Combined with the Cardinal Ring this would make your unit very durable against both melee and magic. Add on the Fort bonus and the Tree Bonus, and your unit will be extremely hard to hit (Thanks to Terror, Fort, and Shield bonus as well as native agi stat), have high physical protection (due to Plate/Shield, Tree Bonus) and be very tough against magic (Thanks to Resist skill, Shield, Cardinal Ring, Tree Bonus)
Unit Type 2 - Cardinal
Weapon - High-Range Rosario
Armour - Robe
Accessory - Mithril Ring/Holy Ring/LiathFail/Valkyrie Necklace
Skills - Resist + Shield + God Defence
Reasoning - A Sister class? Why would anyone want to use her in defence! you may ask in an incredulous voice. The answer is simple. High-Range Rosario + High Luck. The Sister classes have some of the highest luck stats among all the classes. This means that their chance of skill activations are naturally higher than any other class. Add on the fact that their native skill is Resist with their naturally high Int, and they are near impervious to magic. Physical protection is a worry, but that can be negated by the accessories above, as well as training combat Sisters. Sisters have naturally lower melee defences than other classes, but it doesn't mean they can't have somewhat decent defence. Why not Cardinal Ring? Because the primary benefit of the cardinal ring is the magic resistance (+4 defence from the ring only translates to +2 'real' armour). Since the Cardinal has Resist, Int, and Luck, there really is no reason to slot additional magic resistance. What is more important is to try and offset the Cardinals other weaknesses, mainly physical. The Holy Ring is a quest item which gives a mixture of HP, Avoid, and defence, and more importantly, Shield III skill. While I am usually wary of non-IV skills on characters, given the Cardinals Luck I think it is still very worthwhile to put it on her. The second choice is Liathfail. While this accessory doesn't grant any skills, it nevertheless provides a healthy boost to a variety of stats, in this case mainly Luck and HP (but the rest isn't bad). The Valkyrie Necklace is also a quest item, and it grants the ability to directly shave off any incoming physical damage. I don't really think anymore needs to be said about that item. Now, I included Mithril Ring above because those other items can be difficult to acquire (or used on more important characters). Mithril Ring is similar to Cardinal Ring, except it removes the magic resistance to grant some extra int. A properly trained and equipped cardinal unit is a force to be feared. It will be near invulnerable to magic, have high physical defence and a chance to block all damage, and be going around healing the other units for a fairly high amount. Healing 40hp on a low defence character = Not very useful. Healing 40hp on the Servant above = Very very annoying.
My next post will go into the other dominant strategy, which is based around the use of the Hawkeye (and is also the strategy which seems to be used by dRaven)
by galen_swiftblade
Source: http://forum.ein-herjar.com/viewtopic.php?f=10&t=736
